Hello everyone and welcome. This pattern is for my 7x7 mini map using Getaway by Echo Park. I love this paper we have done a few projects with this paper and by far this mini map is my favorite. In this pattern what you are going to get instructions for are the following - Supply List, Cutting guide (for the actual structure of the map) and a picture tutorial on how to construct and apply magnets in the correct places. We will be building this project live on Ustream so you can see exactly how we paper it. Now you will not want to make the inside bulky because it folds in on itself. Same with the outside because it lays on itself when folded out. I hope you will be able to join us for the live class beginning on Tuesday July 29th at 5 PM PST. Here is a direct link to the Scrapadabadoo Ustream Channel
www.ustream.tv/channel/scrapadabadoo-crafts Also there is a kit available for this project and here is your link for that it will come with everything you will need to make this project
http://www.scrapadabadoo.com/item_7219/Mini-Map-Kit-By-Ashliegh.htm Happy crafting my friends!
SUPPLY LIST
- 12x12 Getaway by Echo Park Collection Pack
- 1 Chipboard accents
- 1 12x12 Getaway Solids Collection pack
- 7 12x12 Paper Accents black card stock
- 1 8x8 Heavy Chipboard square cut down to 7x7
- 3 12x12 light weight chipboard sheets
- 8 sets of magnets (16 individual total)
CUTTING GUIDE
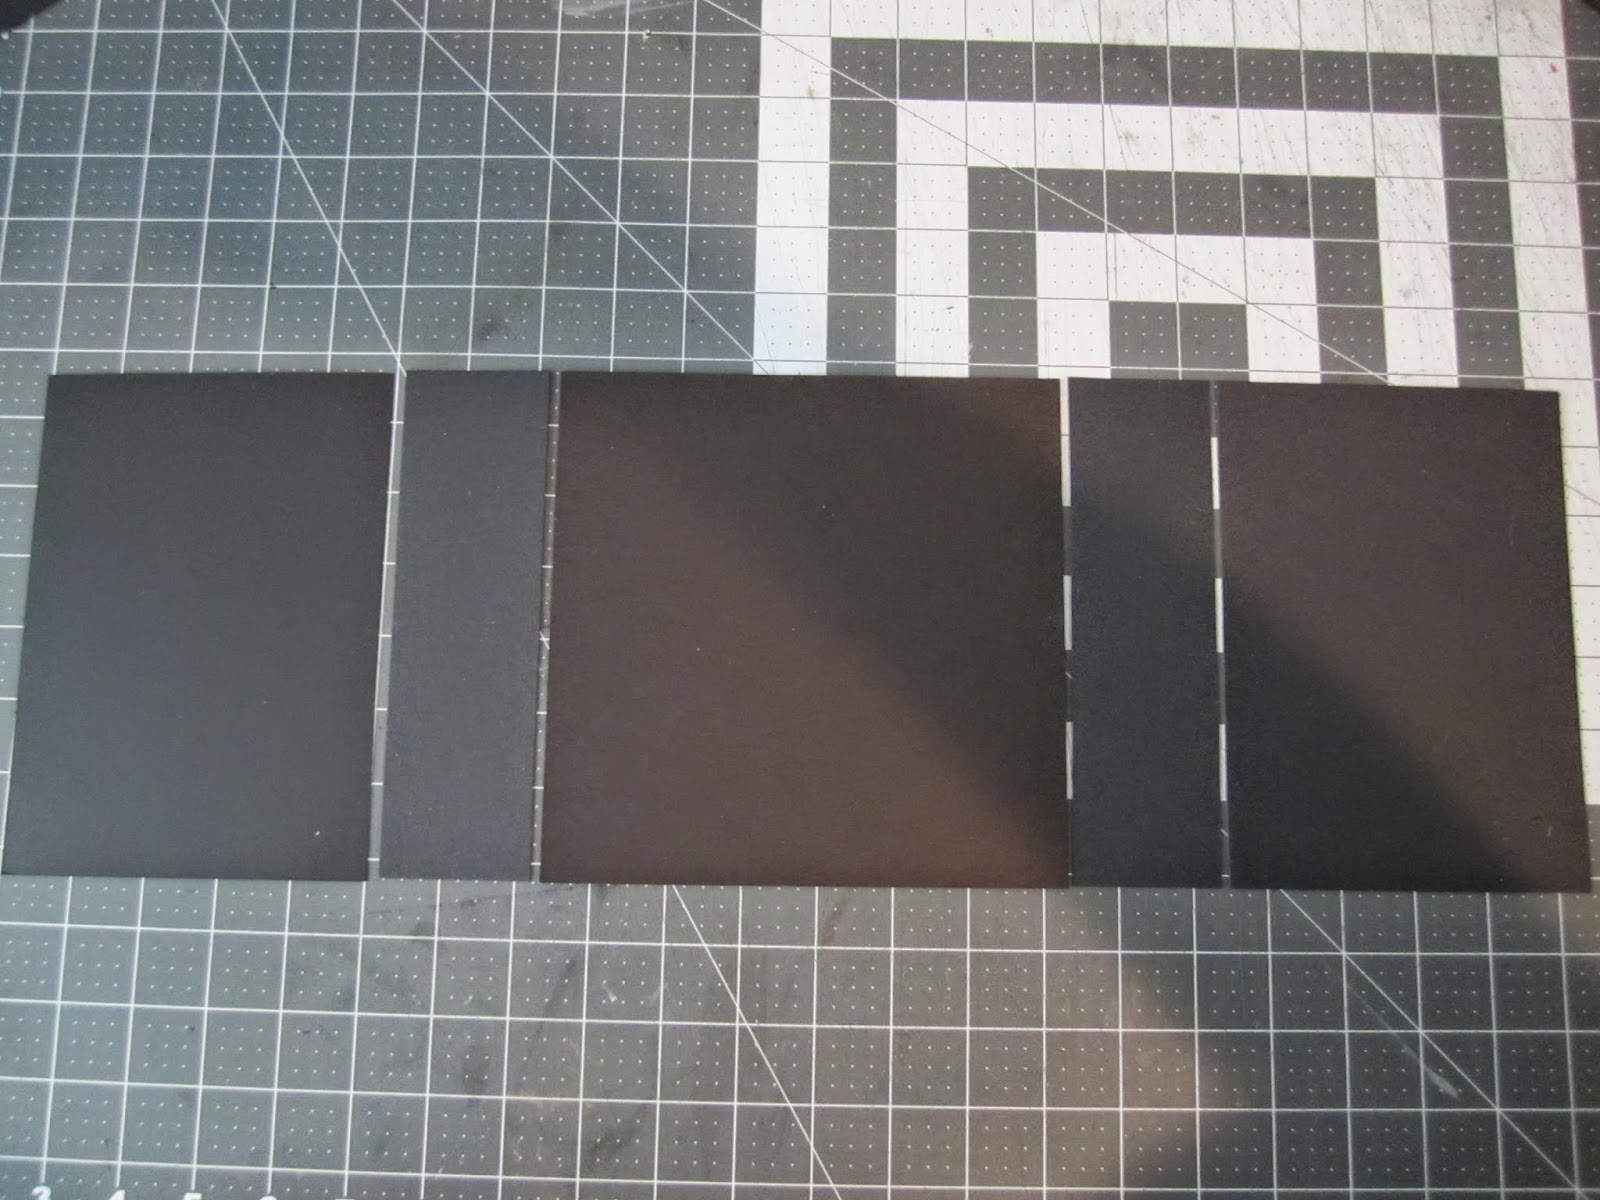
- (16) 1in. wide by 12in. tall scored at 1/2 inch on the vertical. (black card stock constructions strips)
Section A (MIDDLE)
- (1) 7x7 Heavyweight chipboard square
- (2) 2in. wide by 7in. tall lightweight chipboard pieces
- (2) 4 3/4in. wide by 7in. tall lightweight chipboard pieces
Section B (above and below section A)
- (2) 7 inch wide by 1 3/4 inches tall lightweight chipboard pieces
- (4) 6 7/8 inches wide by 1 3/4 inches tall lightweight chipboard pieces
Section C (above and below section B)
- (4) 5 1/8 inch wide by 3 3/8 inch tall lightweight chipboard pieces
- (4) 1 3/4 inch wide by 3 3/8 inch tall lightweight chipboard pieces
- (2) 7 inch wide by 3 3/8 inch tall lightweight chipboard pieces
Section D (above and below section C- structural hinges)
- (2) 6 15/16th of an inch wide by 1 3/4 tall lightweight chipboard pieces
- (2) 6 15/16th of an inch wide by 2 1/2 tall lightweight chipboard pieces
CONSTRUCTION
To start you will be using your cuts in section A of the cutting guide. Layout your 7x7 heavyweight chipboard piece then to the left and the right of the 7x7 piece lay 1 2x7 piece on the left and the right. Then to the left and right of the 2x7 pieces you will lay 1 4 3/4 by 7 piece to the left and the right as shown in the picture below.
Next you are going to hinge all 5 pieces together follow the pictures below leaving 1/16th of an inch between each piece putting your construction strips on the back side. DO NOT MITER YOUR CORNERS!
For this next step you will be using your cuts from section B and hinging them together. First take 1- 7 inch wide by 1 3/4 inch strip (this is your middle piece) now on both the left and the right of this piece lay 1 6 7/8 inch wide by 1 3/4 inch tall pieces as shown in the picture below. REMINDER YOU WILL REPEAT THIS STEP WITH YOUR REMAINING 3 CUTS
Now you are going to hinge these pieces together. You will need to put the hinges in top this time and all chipboard pieces will butt up to the scoreline as shown in the pictures below.
Now repeat withe previous few steps with the remaining 3 pieces from cut guide section B.
When laid out this is what it should look like.
Now the next step in construction is to hinge section A to both top and bottom section B. This step involves 2 hinges 7 inches in length. You will apply the hinge to the top and bottom of the 7 inch square. As shown in the pictures below. You will butt the hinge up to the edge of the scoreline when applying your hinge to the top and bottom of the back side 7 inch square. as shown in the pictures below.
Now take your bottom section B piece and fold it in on its self.
Now take your folded up section B and place it against the bottom of your 7x7 square making sure to line up the sides then fold the hinge up to your chipboard. This will give you the appropriate amount of space between your 7x7 middle section and section B when folding your mini map closed. This is very important to get right. Follow the pictures below.
Now once adhered repeat those exact same steps for the top section of part B. Once that is done the below pic will show you (when folded out) what your mini map will look like thus far.
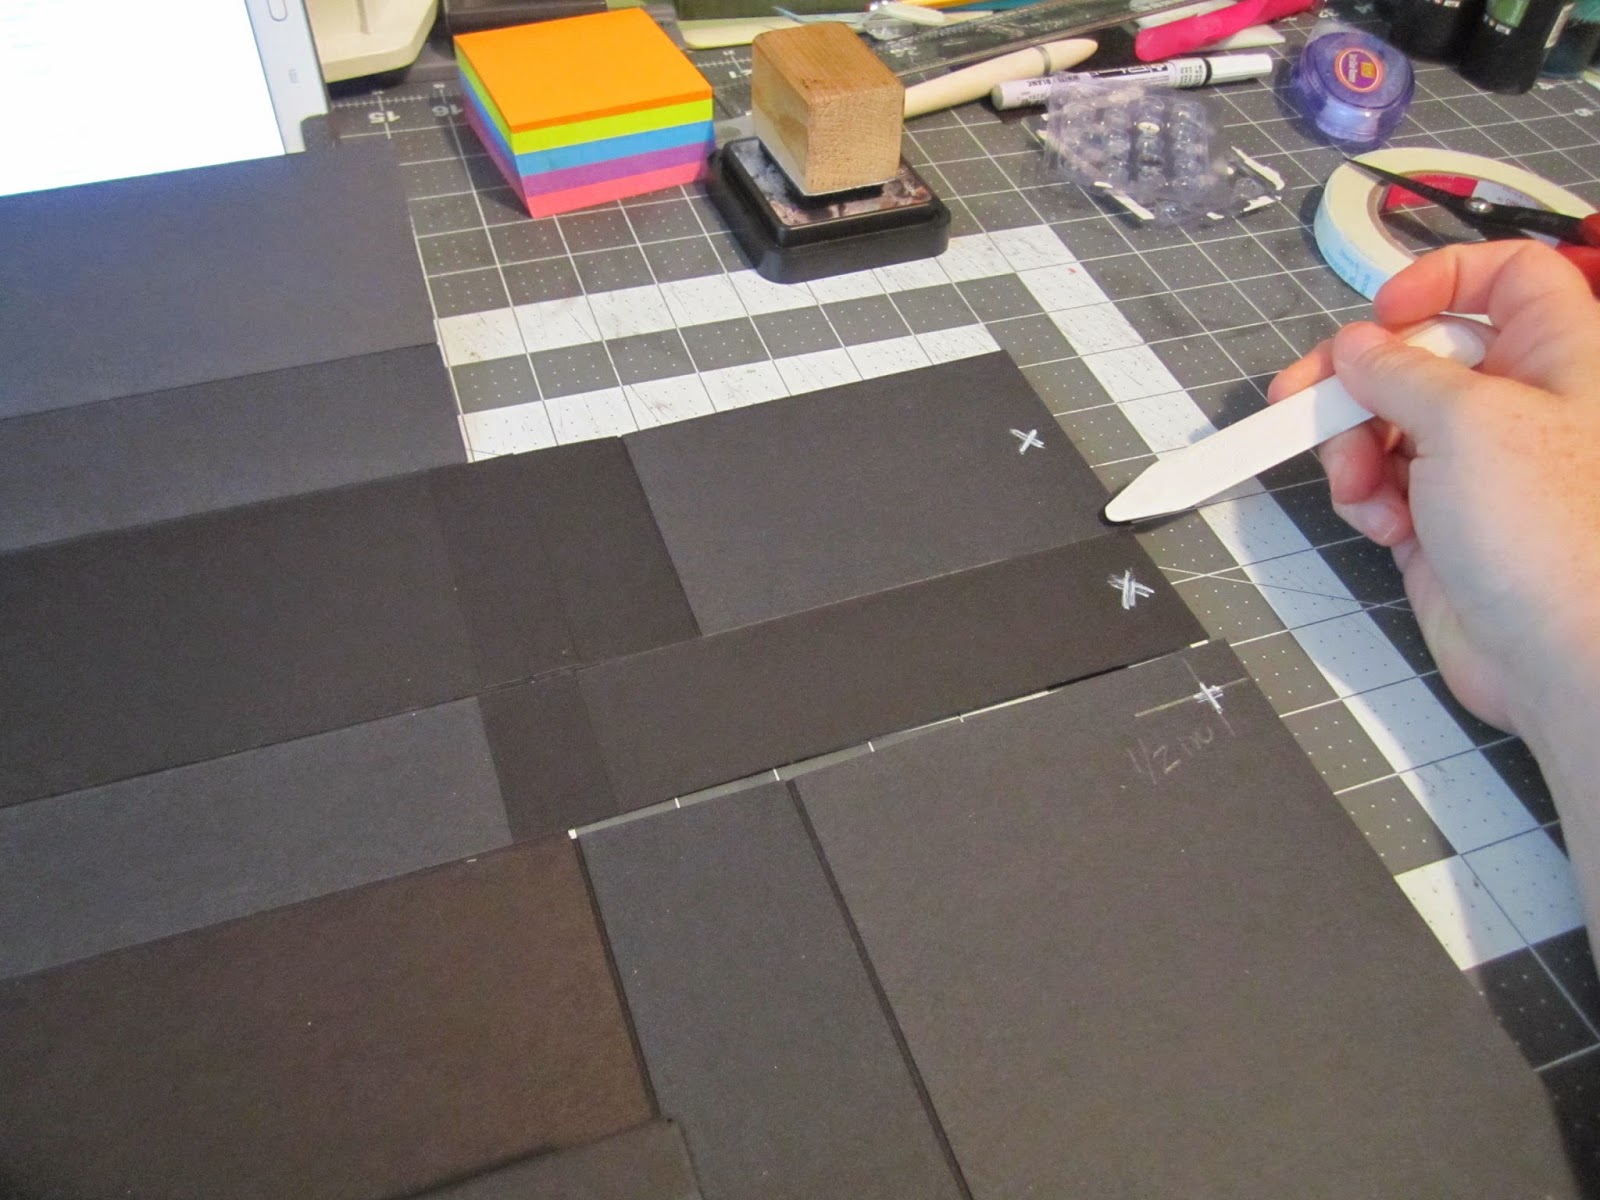
In this next section you will use your cuts from section C of the cutting guide. You will start by taking 1 of your 7 inch wide by 3 3/8 inch tall lightweight chipboard pieces and laying it down in front of you next you will use 2 of the 1 3/4 inch wide by 3 3/8 inch tall lightweight chipboard pieces place 1 of the pieces on the left and 1 on the right of your 7 inch wide by 3 3/8 piece. next you will use 2 of your 5 1/8 inch wide by 3 3/8 inch tall lightweight chipboard pieces and place 1 on the left and the right of the 1 3/4 inch wide by 3 3/8 inch tall pieces you just put down and it should look like the picture below.
Now you will use your construction strips to adhere them together. IMPORTANT INFO the construction strips for the 2 smaller pieces adhered to the bigger middle piece will go on top. The construction strips for the 2 smaller pieces adhered to the medium outside pieces will go on the bottom. Follow the pictures below. Repeat these steps for the top section C as well.
Now you will need to hinge part B to part C again only using (2) 7 inch long strips. For this part you will not butt the hinges up to the edge but get as close without touching 1/32nd of an inch from the center score line on your hinge. Follow the pictures below. Repeat these steps for the top Band C section as well.
This is what your mini map should look like so far.
Now we will be working with section D your final cut pieces. There is just like the previous sections a top and bottom so you will repeat these steps for the top section part D. You will use 1 of the pieces measuring 6 15/16th of an inch wide by 1 3/4 tall and 1 of the pieces measuring 6 15/16th of an inch wide by 2 1/2 tall. You will need 2 hinges 6/ 15/16th inches in length. start by first adhering the piece measuring 6 15/16th of an inch wide by 1 3/4 tall to section C. Again DO NOT BUTT IT UP but come very close to the score line 1/32nd of an inch. You will then adhere the second section D piece measuring 6 15/16th of an inch wide by 2 1/2 tall to the first as shown in the pictures below and again repeat these steps for the top section as well.
Note: Part D is a structural section only.
This is your mini map naked and afraid lol. So lets put some magnets on it and get this project ready for paper.
The following pictures will show you exactly how to fold your mini map closed.
NOTE: When folding your mini map always fold left side flaps first for each section this will help you also with the magnets.
MAGNETS
For this section you will use 8 pairs of magnets that is 16 individual magnets. Start with your box folded up. The top flap should open to your right. On the inside right front flap you will make 2 marks 1 on the top right and 1 one on the bottom right corner. for the top it should be 1/2 inch from the top and the side. The same goes for the bottom right 1/2 inch from the bottom and the side. follow pics below.
Now flip open the bottom half of your mini map and on the section B right side strip you will find the center and place a mark a 1/2 inch from the side shown in the picture below.
Next in section C right side you again will find your center and make a mark 1/2 inch from the side. As shown in the picture below.
Now unfold the top portion of your mini map and do the same thing with your right side top B and C sections as you have done below. As shown in picture below.
Your next step will be in the bottom section D. You will find the center and place a mark (as shown in the picture below) on the back side of your flap right above the hinge you will do the same to the top side section D as well.
Now in your next step you are going to be using adhesive i used 3/8 inch score tape. Cut little squares bigger then your magnets and place them on top of each X that you have made to mark you magnet spots. Now remove the tape backing. Next you will take a pair of magnets and stick them down on top of the tape. Now you will cut 8 more score tape squares and put them on top of the top magnet and remove the paper backing. As shown in the pictures below.
In this next step we will be positioning our top magnets. As shown in the picture below fold over your left side section B piece.
Now you will fold over your right side bottom section B piece over the top of the left one. As shown in the picture below.
Now lift up that right side piece and you will see your magnet is now positioned exactly where it needs to be to line up and for the magnets to work and hold this section closed. As shown in the picture below.
Now you will repeat the same steps for the top section B. Start by folding over your left side section B flap and repeat above steps. As shown in the pictures below.
Now we will be working with Bottom section C. You will take the left side section C and fold it as shown in the picture below. NOTE make sure you are holding it perfectly vertical. As shown in the picture below.
Nect you will take the bottom right side section C and fold it over the top of the the left again making sure to be perfectly vertical. Press where the magnets would be and then pull apart. As shown in the picture below.
In this next part you will be working with the structural section part D. As show in the picture below fold your part D section as shown Remember to keep this sections straight as well.
Now you will fold your bottom left section C flap over the folded section D. Apply pressure where the magnets are and then pull apart to assure adhesion. You will repeat the previous steps for the same sections above. Always start with the left side. As shown in the picture below.
As shown in the picture below this is what your magnetized sections will look like folded up.
Next you will fold all section up and fold to the middle leaving you with a project as shown in the picture below.
Next fold your left side section A piece over and then the right side section over on top of the left appy pressure to where the magnets are and then pull apart. As shown in the picture below.
Now your memory map is complete you just need to add paper and embellishments. For instructions on how to do that you will need to refer to the live class videos on scrapadabadoo crafts Ustream channel. The link was provided for you above.
Thank you so much for joining me. I hope you find this pattern help full. This is my first full pattern and i would love to do more suggestions are appreciated and if you found this pattern perfect as is please let me know so i can adjust my methods accordingly.
HAPPY CRAFTING!
Ashliegh Hepinstall
Owner of this pattern and measurements in conjunction with Scrapadabadoo Crafts. This Pattern is for you to use for free for personal use only.