News Letter Sign Up

Join Our Mailing List
Email:
For Email Marketing you can trust

Tuesday, December 24, 2013

MERRY CHRISTMAS To All...and a Story By Jani

Well here we are again on the eve of Christmas. We have done all we can do to get ready for tomorrow...and if it didn't get done...oh well. I know I could not get everything done that I wanted and that is fine. Each year I have cut back a little more. The recession has played a big part in that but I just don't have the time or the energy to do it up like I used to. There were many years I would bake over 100 dozen cookies and wrap them up festively and my hubby would deliver them to all of our business associates.  I would decorate every corner of the house and the tree was a sight to behold. Each year I was anxious to see what new colors Martha Stewart came up with for all the ornaments and trims and every year I would use different colors.
This year we just hauled all the boxes of those years of different color combos of trims and ornaments out of the rafters in the garage and I gave it all away. Some to friends and the rest went to Good Will. Wow! Did I have a lot of stuff! But now I have my wonderful kitties and they are the best ornament and decorations ever!

Speaking of color combos...I received the loveliest card from Jani Lewis (aka papercompulsions on the chat) It is in turquoise and brown which I just love! And she loaded it with glitter and other sparkly delights. You know my motto..."too much is never enough!"
Not only is the card spectacular...but the message and story inside are so poignant that I just have to share it with you.
Here is her beautiful card. And below is her story inside. I hope you enjoy it as much as I did.
                                    

Written by Jani Lewis
(on the inside of card on cream colored cardstock)

Believe it or not the top panel on the front of this card started out as plain, ordinary ivory cardstock just like the one this is written on. I cut it, stamped on it, tore it, inked it, painted it, and heated it using a very hot embossing gun. If the paper could feel and talk it might have complained or cried out in protest. The cutting and tearing had removed pieces from the paper. The stamping and inking had applied pressure and left marks. Not to mention the heat tool that was so hot it literally melted plastic powder right into the paper. It might have wondered why in the world I was doing all this to it. (After all, the paper had never done anything hurtful to me.) The thing is, it was just plain paper and I had a vision in my mind of how to make it more than that. A plan to make it beautiful.  Each step in my torturous process was necessary to go through to achieve the end result. 

As we celebrate the birth of Christ, we often focus on the beautiful story. We know how things progressed and the wonderful ending. We see the big picture. We should never lose sight of the steps that all the plain, “ordinary” people involved in this divine event. They had no idea what difficulties and hardships they would have to go through on their journey. They probably did not like some of the experiences such as traveling a great distance when nine months pregnant or the smell of the stables.  They may have expected that since this birth was God’s will, everything should seamlessly come together.  After all, this was the son of God. Shouldn't everything be perfect and problem free? I think the real point is that they did know this was God’s plan and just trusted Him throughout the journey.  They did not know how things would unfold or why situations where so difficult to deal with. They did not know how things would ultimately turn out. They just trusted that God was working in their lives to bring about His will. To craft the most beautiful story ever told.
Jani

Thank you Jani for such a beautiful card and such wonderful food for thought in your heart warming story.

Here is another card I made. I had lots of fun with this one.


And with this I will close and wish you all a very Merry Christmas and tell you all how much we love each and every one of you. Thank you for all the love and support you give us. I hope we will share many more Christmases together. Have a wonderful and joyous day!
Merry, Merry Christmas,
Barrie & Carol

Wednesday, December 18, 2013

Christmas Gifts

Well here it is the week before Christmas and I am feeling like I have a handle on things... Cookies are half way done, I only need to find one more gift and the house is not in shambles... I did have one tiny... well 32 lb. problem.... Sam our adorable not so bright puggle got into the craft room and ate some of my girls gifts... I can imagine he had a rude awakening when he realized it was just a bunch of spices... red pepper is not his thing....
I at least got a picture of what they looked like before they were torn to shreds and spread all over the living room and hall... I should have though to get an after picture too.. but I was just a tad bit angry and had to get it cleaned up so he could come back inside as it was just way to cold for him to be out for long...
So.. I made great use of the We R Memory Keepers Box Board and made boxes to hold 5 different packs of dip mixes..
Each box is made with papers from the Graphic 45 12 days of Christmas.. and then with the
We R Memory Keepers Envelope Punch Board I made bows... They were super easy and what a great second use for the board !!   
 
 
I found a great site that had recipes for dip mixes so I mixed those up... put them in little bags and found I had an old Sizzix die that was bag toppers...
 

I printed out the name of the dip and what to mix it with on a return address label and attached it to the back of the bag... We even tested the mixes and they are great... I have everything to make samples for Christmas Day so the girls can see what they are...
 
Here is a link to the video showing how to make bows with the envelope punch board and also the link to the mix recipes... She put them in adorable ornaments and that is a great idea too..
 
This is a quick gift and If I can make them twice for Christmas....... well you know
 
Be sure to check back tomorrow as I have found some great ideas for the new Viva Décor products we just added to the store !!


Hugs Carol


Monday, December 16, 2013

Christmas...already???

Wow!! Has time flown by or what??? Can you believe Christmas is only ten days away?
Every year I tell myself that Thanksgiving is Christmas...because you think "I have a month"...then you find out how short 30 days really is!
It is really hard for me to get in the mood for the holidays when it is 85 degrees. With each passing year I seem to lose my enthusiasm for all the holiday festivities and it has become more of a chore than anything else.
I used to love to do mountains of baking and decorate the house and wrapping presents was my forte...the wrapping and bows were at times nicer than the gift inside...LOL...But , alas...I am just not in the mood for quite so much.
Also...what do you think my kitties would do to the tree?? OMG!!! "thanks Mom...toys!"
When Sammi, my chocolate Lab was a teenager he decided we put up the tree just for him. I left for just about an hour and when I came home he had the tree and it's finery strewn from one end of the house to the other. My beautiful tree was everywhere. And of course Sammi ran to greet me with a big doggie smile from ear to ear saying "look what I did". I couldn't be mad at him...he had so much fun. I just left the mess for his Daddy to see when he came home and then he helped me pick up the tree and we cut a hole in the bottom of a large garbage bag so we could pull it up over the tree and hauled the whole thing...decorations, lights, ribbon and all out to the trash...D.O.N.E.! It was all worth the smile on the puppy's face and his tail wagging his whole body.
I don't really want to see what the cats would do!

I did manage to get my Christmas cards done and they will get in the mail in the next few days. Some of them I am afraid to mail. I know they will not arrive in good shape. I will make sure they more fragile ones go in the gift boxes..
I will post some thru the week on here. I don't get a chance to do much crafting anymore so this was a treat.
I have also been hunting down some new and exciting products for you all. I am excited about them and I hope you will enjoy them. As soon as they get delivered I will post some tutorials and projects for you to try...so keep checking back...

Here are a few of my cards....


On this one I used the Taylored Expressions Holly Background die, I just love these die plates. They are perfectly sized for A2 cards. The deer and Cardinal are form the Birch Elements also by T.E..
I stickled the whole background but it doesn't show.


Here I used the Birch Background and Elements from Taylored Expressions. I wish I could get the glitter to show...I love glitter!


This is the cute little bear from The Homemade Gift set. I took the Holly Branch from Cottage Cutz and die cut several pieces than cut the leaves apart and layered them for the wreath. You can do this with just about any leaf die cut or punch. I will try to photograph it for the depth and dimension.
This technique looks really great with the Branch punch from Martha Stewart.

Keep checking back...tomorrow I will post one of my favorite recipes. Keep sending us your favorites too.
Good nite all.
Sweet dreams,
Barrie & Carol


Tuesday, December 3, 2013

Holiday Recipes & Give Away

We are so glad you hopped over to share your cherished family recipes with us.
We will be sharing these recipes in our news letter and each week one person will be chosen for a Prize... what the prize is will be announced each week when we pick the winner. You can enter as many times as you like and Winners will be picked from all entry's not just the ones posted each week.
 
I will start out with our traditional Breakfast recipe that I have made for years..
 
Butterscotch Bubble Loaf

Ingredients

24 Rhodes Dinner Rolls, thawed but still cold
1/2 box butterscotch or vanilla pudding mix, non-instant
1/2 cup pecans or walnuts  chopped
1/2 cup brown sugar
1/2 cup butter or margarine

Instructions

Cut dinner rolls in half re-roll and dip in dry pudding mix. Arrange rolls in sprayed Bundt pan, alternately with pecans. Sprinkle any remaining pudding mix over the top. Combine brown sugar and butter. Heat together until butter is melted and a syrup is formed (microwave about 1 1/2 minutes). Pour syrup over rolls. Cover with sprayed plastic wrap. Let rise until double in size or even with top of bundt pan. Carefully remove wrap. Bake at 350°F for 30-35 minutes. Cover with foil the last 15 minutes of baking. Immediately after baking, loosen from sides of the pan with a knife and invert onto a serving plate.
 
Share your recipe in the comments to be eligible for the give away !
Hugs Carol & Barrie

Monday, December 2, 2013

Optimist Album Winner

I know I am a day late.. and probably a dollar short but the winner of the Prima Optimist Album is......
 
 
Auntie Maggie aka Margaret Halldorson !!!!
 
Wow what a wonderful album. Well done Carol. You have given me all kinds of ideas now. My creative juices are flowing. Hope they are still there after Christmas. Thank you for sharing your talent with us and giving us a chance to win this fantastic album.


Congrats and I will get this out to you next week !  Thank you to everyone who left a comment and as soon as I get all of the orders packed from the Sale week end.. we will do another give away..
Hugs Carol

Wednesday, November 27, 2013

HAPPY THANKSGIVING!

I just want to take a moment to wish all of you a happy and wonderful Thanksgiving Day. I hope your day is filled with all the wonderful goodies and lots of family and friends. Rejoice in all we have to be thankful for and please take a moment to bow your head and pray for friends who are struggling right now. Wish them peace and comfort and love from each and every one of us.
Take a moment to reach out to someone that has gotten out of touch or drifted away for whatever reason. You never know how much that simple act of kindness and caring could brighten some one's day
And please give thanks to our troops so far from their homes and families. Thank you to them for all the sacrifices and the hardships they endure so we stay safe at home with our family and friends.
Blessings to you all ... and please....just take a moment...

Love,
Barrie & Carol

Monday, November 4, 2013

Optimist

There is nothing I love better than crafting with a paper that just makes you want to keep going and leaves you feeling Sad when the last embellishment is in place... The Prima Optimist paper is one of those for me... With papers that are not only beautiful, but have a positive message, it is a joy to have your pages come together and love each and every one of them.
I started with The Basic Grey 7"x9" Album and then painted the outside with Claudine Hellmuth Charcoal Studio Paint.


Covered the Album with one of the amazing papers in the Prima Optimist Collection, added a few roses using the Sizzix
Sizzix Original Flower Layers 5 "Grunge Rose" cut from scraps of Optimist Papers, added some misc. leaves and the final perfect touch was the BoBunny Jewels (frosting)


The Cover came out like this


I love making the Grunge Roses and they are perfect to match this cover !
 
I just continued to have fun until all the pages were done and I had nothing but scraps of paper left... yup I used the whole darn collection...


The Basic Grey 7"x 9" Kraft- 3 ring heavy-weight chipboard album includes 4 regular pages, 4 designer die cut edge pages(curved bracket, scallop, pinked, and swallow tail), as well as an envelope pocket page, for a total of 9 inside pages and all are Kraft color. Outside measurement about 8.75"x 10"x 2". And are all fun to decorate


The Paper Accents Pockets are a perfect compliment to this album as they give extra space and can be either decorated with stamps, stencils or even covered with the paper.
 

I also used the WRMK Chalkboard Journaling cards throughout the album. They have several designs that can be used as mats or Journaling spots. They come in a package of 275 cards in 3"x4" & 4"x6" Sizes. They are all double sided and have sayings, as well as several line styles for Journaling.


I also used the Prima Optimist Tabs on each of the pull out Tags and although you can't see them well they add a great touch to the album.


The collection comes with a page of uplifting words that I cut apart and used for Embellishments.. Oh and don't forget the sugar dots... ya gotta have dots
 
 
The Buttons are so beautiful and even though I wanted to hoard them, I decided to go ahead and add them in too !!  All in all this was a great project ... and loved every minute of making it... and guess what.. it can be yours.. all you need to do is leave a comment and on December 1st we will pick a winner !!
Thanks for looking and now I am onto making the 
 
Treasured Memories Album Trunk from Kathryn Scraps
Just click on her link and you can make one too !!
 
 
Some of the other items that were used in the album are


http://www.scrapadabadoo.com/item_3510/Lifestyle-Crafts-Tab-It-Die-Kit.htm


Sunday, October 27, 2013

Finally Here!

It now seems like the norm...waiting for the new TH products to arrive. delay,  after delay, after delay and finally the new Stencils are in We received all except  the Rays and Splatters which are still on back order and should be in soon.
 

We're anxious to see what you all do with these. There are some fun designs. So get out your inks and sprays, paints and paste and start creating. You never know when Carol will decide to put up a challenge or a give away. So show us what you do with some of Tim's new stencils or the new WRMK Boards.
We are looking at a new paste that may be easier to use with these more detailed stencils. We will know soon if it will work and let you know...also if it is in our price range to bring in.
 
Happy creating,
Barrie & Carol


Friday, October 25, 2013

WRMK Punch Boards

These punch boards are super fun and getting started with them can sometimes be confusing.. here is a link to the tutorial on how to do the candy box. We have all four of the boards available at www.scrapadabadoo.com
 
Enjoy !


Saturday, October 19, 2013

More Great Products

More Great things have been added to the store. We now have the New Prima Optimist Papers and Embellishments, Paper Accent Calendars, Stickers and New Sizzix dies !!!
The Optimist Papers are Wonderful and I am sure there are dozens of Projects to use them with.  I am headed to the craft room to Make the Calendar using the Graphic 45 Place in Time 8x8 pad... Pictures soon !!
Visit us at www.scrapadabadoo.com


Thursday, October 17, 2013

Coming Soon
 
We are so excited as we got notification from WRMK that our order for the new Punch Boards has been sent to the warehouse and will be shipping soon .... Be Sure to keep an eye on the What's new in the store to get yours !
 
Which one is your favorite ?
 
 
The Gift Bag
 

The Gift Box
 
The Pillow Box
or
 
The Candy Box ?


Tuesday, October 15, 2013

Side By Side and Christmas Cards

Gosh it has been so long since I have been to our blog that I even forgot our password... that is just a sin for sure ... I am hoping to do a better job and post on a regular basis...
 
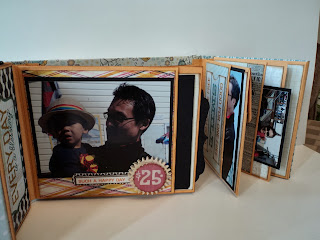
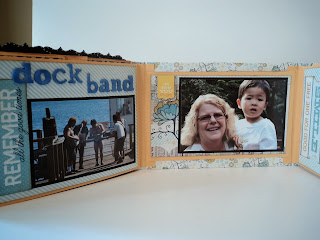
First up I have the Side By Side Mini Album created using the pattern from Kathy Orta Files Book
 
I had pictures from this summer when our exchange Student Yuko came to visit with her Husband, Son and Mother. I was so excited and during their visit we took them on a ferry trip to Orcas Island. We had such a great time and this book will be sent back to them so they can remember the trip.
I chose to work with the new MME The Sweetest Thing Kit as it was not only sweet but also gender neutral too...
 

The Crochet Flower and Banner, both from the paper kit, were the perfect fit for the Cover .


I created the closure from a piece of lace, with Velcro on the back that will expand with size


There are so many pages and pockets in this album and it makes for fun layouts. The paper kit has a ton fun elements that it really made it easy to decorate, but kept it simple and quick


I also had the opportunity to use my Tab -it-Kit for making the Tabs on the pull out pages


With every turn of the page there is something new to discover and the pockets are great for so many of the little things we saved along the way, such as out Ferry Tickets, Parking Tickets and the receipt for lunch.
 

Little Daichi was such a good sport as he was stung by a bee the moment we walked off the ferry onto the island.. He only cried for a minute and then he was a happy camper ! 


Sure hope they love having it as much as I loved making it... Kathy's instructions are easy to follow and once you make the album once, the second third and forth are a piece of cake !!
My next project is getting all the pictures put in albums from when the grandkids were here for the week... those will be the typical 12x12 layouts and I will be posting those as I go.. I think I took 200 or more pictures and have managed to pair that down to a reasonable number...


Then it was on to Christmas Cards... after all, how can you have a set of new dies and not use them?


21 Dies and 7 Stamps


This was so fun to put together, and I am sure that it will make a great gift card or money holder for one of the grand kids. The dies are more than capable of cutting out double layers, so mass production with these is not impossible. I love the word dies as that makes it super easy. I ran all the small pieces of paper through my xyron prior to cutting them out, so they were just a peel and stick kind of thing ...


The Stamps were really nice to use and worked well with the mittens,
which do have great detail on them but of course this  picture doesn't  do them justice...


There are several Bows in the set and they are all amazing.. and once again the Die Cut words are wonderful... Simple and fun. The Papers on the Mittens and Bows are the back sides of the Graphic 45, 12 days of Christmas and are so pretty. And as you can see these cards are A2 Size so the dies are a great fit !
 
 
Thanks for taking a look and hope you'll come back and bring a friend !!